Open a workspace and make your first project
Start with a small, useful Python program: a plan for a balanced image dataset. Then open AI Vision Lab to generate images and train a model. The plan in this chapter performs arithmetic only; it is not model training or a generated dataset.
This walkthrough uses Developer ID 27.0.2 (32) with Helper 0.5.3 already connected. For Helper readiness and installation boundaries, see Helper. If the app is not installed yet, follow Install the free Developer ID edition and confirm its version before continuing.
You will create a new project, save a short program and recognize its completed output. The program needs no third-party Python libraries. Its full text is below; you do not need the companion ZIP to follow this chapter. If Vision Dataset Notes already exists, use a different project name so your earlier work stays untouched. This is not a clean-install or Helper-installation walkthrough.
Find an existing project
- Choose File → Show Project Launcher.
- In Search a workspace, or type a path…, enter part of a project name.
The review searched for
vision. - Check the highlighted result and its description.
- Press Return to open the highlighted project.
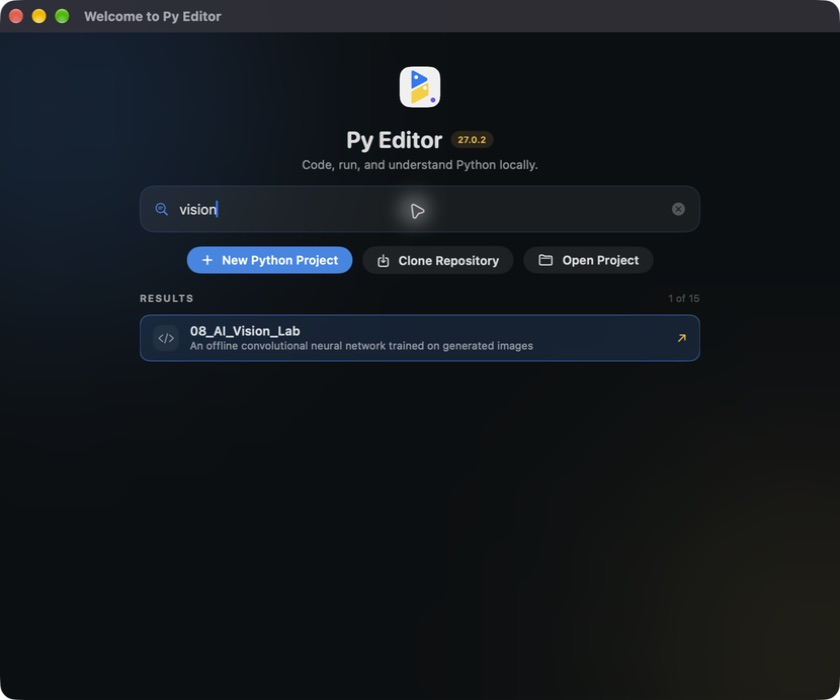 Open the screenshot to view it at full size.
Searching for vision found 08_AI_Vision_Lab. Return brought its existing
window forward with the selected file and Terminal transcript still present.
This is an already-open-window check, not proof of restoration after quitting
the app.
The unfiltered launcher showed the six most recent projects, with a count of all known projects. Search can reveal entries outside that short list. The counts in the screenshot belong to the review Mac and will differ on yours.
If no result matches, the launcher suggests trying part of a name, description or path. Use Clear workspace search at the end of the search field to return to the recent list. A project absent from recent history is not necessarily missing from disk: use Open Project or File → Open Project… to choose its folder. See the verified existing-folder procedure.
Clone Repository is a separate action for obtaining a repository, not a way to reopen an already local folder. You can inspect its setup without starting a clone:
Inspect clone setup without starting a clone
- In the launcher, click Clone Repository.
- Leave Repository URL empty. The displayed GitHub address is example text, not a repository selected for cloning.
- Check Save in. It initially points to Py Editor's Projects folder. Click Choose… if you want to inspect the macOS folder selector, then click Cancel without selecting another folder.
- Confirm that Clone is unavailable while the repository URL is empty.
- Click Cancel to return to the launcher.
The reviewed sheet says that Py Editor Helper performs the clone and then opens the new project. The steps above made no network request, contacted no repository and created no files. Authentication, private repositories, clone failures and a completed clone remain outside this verified procedure. This chapter does not ask you to remove recent entries or overwrite a project.
Search by a known path
The field says Search a workspace, or type a path…, but in this build a typed path searches the projects the launcher already knows. It is not a general “open any folder on disk” field.
- Enter the full path of a project you have previously opened.
- Check that its result is the folder you intended.
- Press Return to open that result.
In the review, an existing folder that had never been opened showed No workspace matches; Return left the launcher unchanged. A nonexistent path also showed no match. After the existing folder was opened through Open Project, the same path produced one result and Return brought its existing window forward.
No workspace matches does not establish that a folder is missing. If this is your first time opening it, use the folder chooser below.
Open a folder that is not in the launcher yet
- Click Open Project in the launcher.
- In the macOS folder chooser, select the project folder. If you know its full path, press Command-Shift-G, enter that path and press Return.
- Check that the chooser is showing the intended folder, then click Open.
- Check the workspace title and its Project tree.
The reviewed folder contained only a README. It opened in a new workspace with that document selected and Project .venv not created still displayed. No Python code was run or environment prepared just to open this document folder. The folder then appeared in the launcher's project list. This is distinct from New Python Project, which creates starter files.
Create a project in a new folder
- In the launcher, click New Python Project.
- Enter
Vision Dataset Notesin Save As. - Check Where. Expand the dialog if you need to inspect or change the destination. The review used the app's Projects folder.
- Use a new name that does not replace an existing project.
- Click Create.
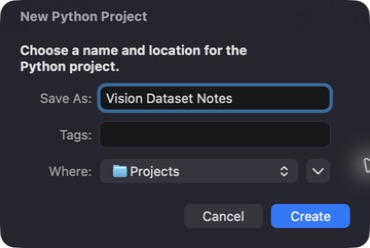 Open the screenshot to view it at full size.
The new project opens in its own workspace window with main.py and pyproject.toml in Project. main.py contains a starter program; replace it with the exercise below. Creating a project does not close the other project windows.
Write a dataset plan
Select main.py in Project.
Click in the code editor, select all its contents, and replace them with:
"""Plan a balanced image-classification dataset."""

CLASS_NAMES = ("vertical", "horizontal", "diagonal")
SAMPLES_PER_CLASS = 180
IMAGE_SIZE = (20, 20)


def main():
    total = len(CLASS_NAMES) * SAMPLES_PER_CLASS
    print("Vision dataset plan")
    print(f"Classes: {len(CLASS_NAMES)}")
    print(f"Images per class: {SAMPLES_PER_CLASS}")
    print(f"Total images: {total}")
    print(f"Image size: {IMAGE_SIZE[0]} x {IMAGE_SIZE[1]}")
    print("Plan only: use AI Vision Lab to generate images.")


if __name__ == "__main__":
    main()
Press Command-S to save.
Check that the toolbar configuration reads Current Selected File and that main.py is the selected file.
Click Run active configuration, the play button in the top toolbar.
Read the program's output in Run, in the Bottom Results area.
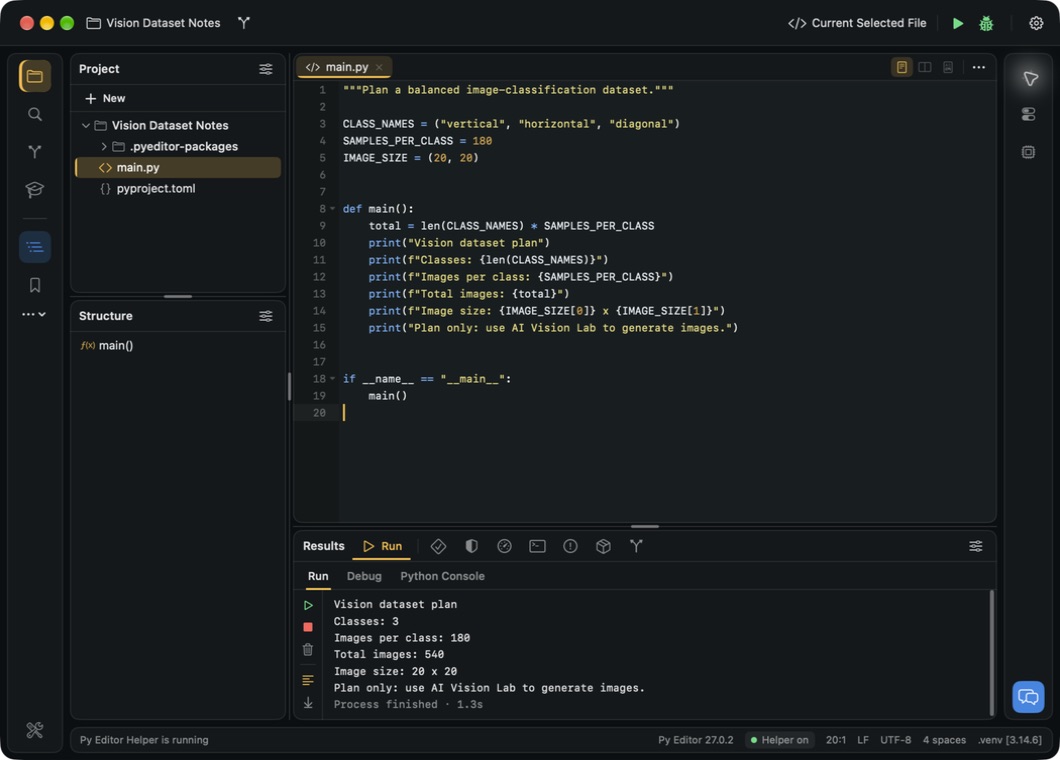 Open the screenshot to view it at full size.
The verified output is:
Vision dataset plan
Classes: 3
Images per class: 180
Total images: 540
Image size: 20 x 20
Plan only: use AI Vision Lab to generate images.
In this run, the status changed from Project .venv not created to .venv [3.14.6] during execution. The app prepared the project environment automatically; no separate Prepare button or package-install command was used. Allow preparation to finish and read any prerequisite message on your Mac. This observation requires the already-connected Helper and does not establish first-run behavior without it.
The completed run also displayed its elapsed time. Your timing may differ. Read the actual program output rather than treating every Process finished footer as proof of success; see task-result limitations.
Return to your work
Choose File → Show Project Launcher, search for Vision Dataset Notes, and press Return. The review returned to the same project window with its code and completed output retained. The new project also appeared in File → Recent Projects. Closing the whole app and reopening it is a separate restoration scenario that has not yet been replayed for this edition.
Continue with the full example
Open the prepared 08_AI_Vision_Lab project and follow Run AI Vision Lab and read its report for real dataset generation, training and evaluation. Unlike this arithmetic plan, that example requires PyTorch, NumPy and Matplotlib. Its environment preparation is a separate step from creating the simple project above.
For questions entered while a program is running, use the verified interactive class inspector. For the roles of Left, Bottom and Right, see Arrange the workspace.