Explore a running example interactively
Py Editor for Mac · Developer ID 27.0.2 (32) · reviewed with Helper 0.5.3
Use Python Console to execute a file and then inspect Python objects in the same interactive session. Use Terminal for shell commands. They are not two names for the normal Run output pane.
For ordinary script execution and its Stop/Clear controls, see Run a script and read its output.
Keep the interactive tool open while you work. In this build, minimizing Results or switching from Python Console to Run discarded the console's objects and transcript. Terminal also restarted after minimizing Results or visiting Packages. Hiding Results also ended the reviewed active Python waits in both tools; reopening them did not resume those commands. See panel and session lifetime before reorganizing the workspace.
Run a program that asks you a question
This exercise adds a small class inspector to your editable 08_AI_Vision_Lab copy. It uses the example's real dataset and its existing PyTorch environment. Prepare that environment using the Helper guide first.
Choose File → New File….
Check that the dialog says Created in 08_AI_Vision_Lab.
Enter
inspect_class.pyand click New File. Choose another unused name if you already have a file with this name, and use it in the command below.Enter this code in the new editor tab:
"""Explore a class in the AI Vision Lab dataset."""

from data import CLASS_NAMES, make_dataset

print("AI Vision Lab: class inspector")
print("Available classes: " + ", ".join(CLASS_NAMES))
class_name = input("Class name: ").strip().lower()
if class_name not in CLASS_NAMES:
    raise ValueError("Choose vertical, horizontal or diagonal.")

_, labels = make_dataset()
class_id = CLASS_NAMES.index(class_name)
count = int((labels == class_id).sum())
print(f"{class_name}: {count} of {len(labels)} images")
Save with Command-S.
Open Terminal in the Bottom Results area. Confirm it is in the AI project folder, where
data.pyand your new script are saved.Enter this command and press Return:
.venv/bin/python inspect_class.pyWait for Class name:. Type
verticaland press Return.Read vertical: 180 of 540 images. The shell prompt returns when the program finishes.
Use the Terminal for this reviewed workflow. Clicking Run active configuration
with the same file and project .venv printed the question but immediately ended
with EOFError: EOF when reading a line, without an input field. The Terminal
success does not mean the normal Run pane accepts input in this configuration.
Recognize invalid input and try again
At the shell prompt, press Up to recall the previous Python command.
Check the recalled command, then press Return.
Wait for Class name:, enter
circle, and press Return.Read the last line of the traceback:
ValueError: Choose vertical, horizontal or diagonal.Wait for the shell prompt, then press Up and Return to run the command again.
This time enter
horizontalat the class prompt and press Return.Confirm horizontal: 180 of 540 images and the returning shell prompt.
The ValueError is an intentional check in this tutorial: circle is not one of
the dataset's labels. You can correct the answer on the next run without editing
the program or reinstalling a package. This differs from EOFError, where the
program did not receive an answer at all. Full tracebacks may include personal
paths; share only the relevant, reviewed details when asking for help.
Load AI Vision Lab into Python Console
Prepare the example's project environment first, following Helper and project environments. This procedure executes the example: it trains its small model and regenerates the report, just as a normal run does.
Select main.py in 08_AI_Vision_Lab.
Choose Run → Run File in Python Console from the menu bar.
Wait for Loaded: main.py above the console.
Wait for the
>>>Python prompt before entering another expression.Enter the following assignment and press Return:
training, validation, test = split_dataset()Enter this expression and press Return:
print(len(training), len(validation), len(test))
The verified result is 378 81 81: 540 synthetic examples divided into the
training, validation and test sets. These are objects in the current session;
entering the assignment does not add that line to main.py.
Inspect variables beside the prompt
- Click Refresh variables after creating the objects.
- Select Values in the Variables filter.
- Type
trainingin Search variables. - Read its name, scope, type and value representation.
- In the console, enter
len(training)and press Return.
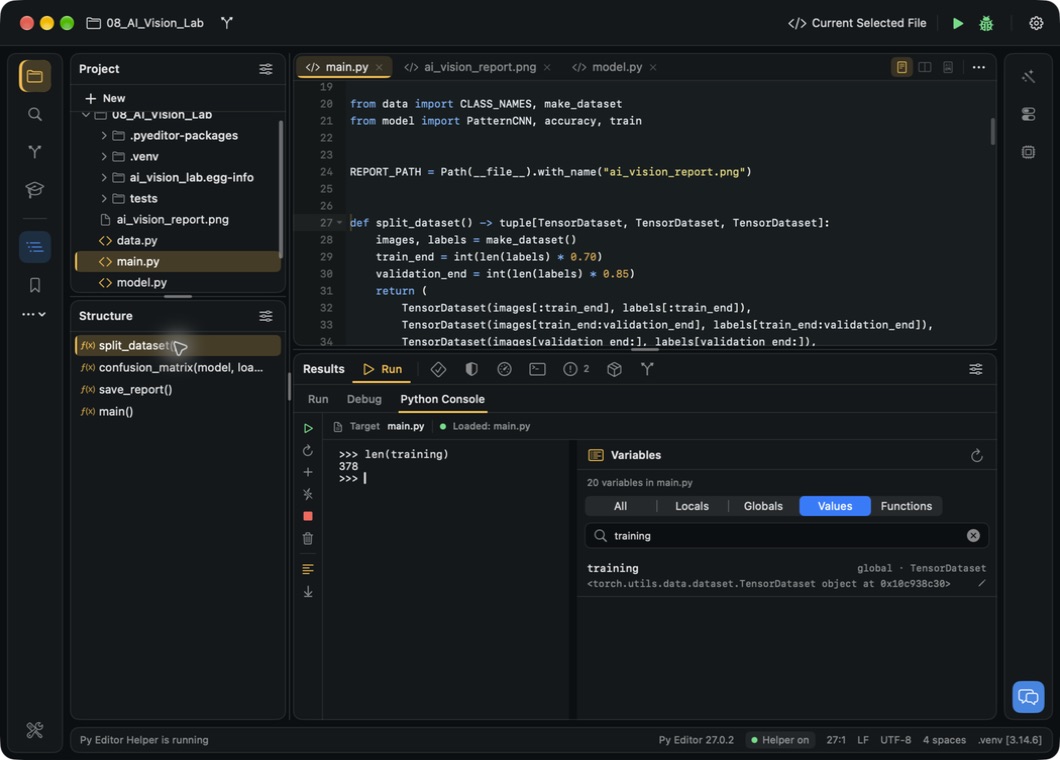 Open the screenshot to view it at full size.
The verified Variables panel changed from 17 to 20 entries after creating the
three dataset objects. The filtered object is a global TensorDataset. Its
object representation is not the dataset's complete contents; ask Python for the
specific property you need.
The screenshot shows a cleared output pane followed by the shorter
len(training) expression. Clearing output did not remove the session's objects.
It also avoids displaying the report's personal filesystem path.
Choose the right filter
The search field works within the selected filter. If a name seems missing, check both the filter and the search text before assuming the object was lost.
For a small example, enter these assignments at the Python prompt. They create temporary objects using AI Vision Lab's class names; they do not edit its files or train a model.
sample_count = 540
selected_class = "vertical"
class_names = ["vertical", "horizontal", "diagonal"]
describe_class = lambda name: "Pattern: " + name
Click Refresh variables, then select each filter. With only these four sample objects in a fresh console, the review showed:
| Filter | Visible sample objects |
|---|---|
| All | All four objects, including describe_class. |
| Locals | No locals to show. These assignments were made at the top-level prompt. |
| Globals | The list, integer and string; not the function. |
| Values | The same three values in this example. |
| Functions | Only describe_class, identified as a global function. |
The 4 variables status remained the total; it was not the number of rows visible after filtering. This check does not establish how a paused function's local variables appear.
To see how search and filters combine:
- Select Functions.
- Enter
selected_classin Search variables. - Observe No variables match this search.
- Select Values, leaving the search unchanged.
- Confirm that
selected_classappears with type str and value'vertical'.
The variable was not recreated by switching filters; it was hidden by the previous filter.
Change a value without editing the file
Use this to try a different value in the current interpreter. It does not save that value into your Python source. Expressions can execute code, so enter only an expression you understand.
- At the
>>>prompt, entermanual_probe = 42and press Return. - Click Refresh variables.
- Select Values and clear Search variables so a previous function filter or search does not hide the integer.
- Find
manual_probe, shown as a global integer with value42. - Click its Edit pencil.
- Replace the value in Python expression with
84and press Return. - Enter
manual_probeat the console prompt and press Return.
Both Variables and the interpreter returned 84 in the reviewed session. The
name is a temporary test object, not a change to AI Vision Lab. This check covers
a global integer; it does not establish that every object or local variable can
be edited.
Edit a string and cancel a later change
After the filter example above, keep Values selected and search for
selected_class.
- Click the Edit pencil beside
selected_class. - Replace Python expression with
"horizontal", including the quotes. - Press Return.
- Check that the row now shows
'horizontal'. - At the console prompt, enter
print(selected_class, describe_class(selected_class)).
The verified output was horizontal Pattern: horizontal. The expression field
expects Python, so quotes are part of a string expression, not decoration.
To discard a proposed edit, click the pencil again, enter "diagonal", and
press Escape instead of Return. The row and a repeated console expression both
remained horizontal in the check. Escape cancels the unsubmitted edit; it does
not undo a value you already submitted.
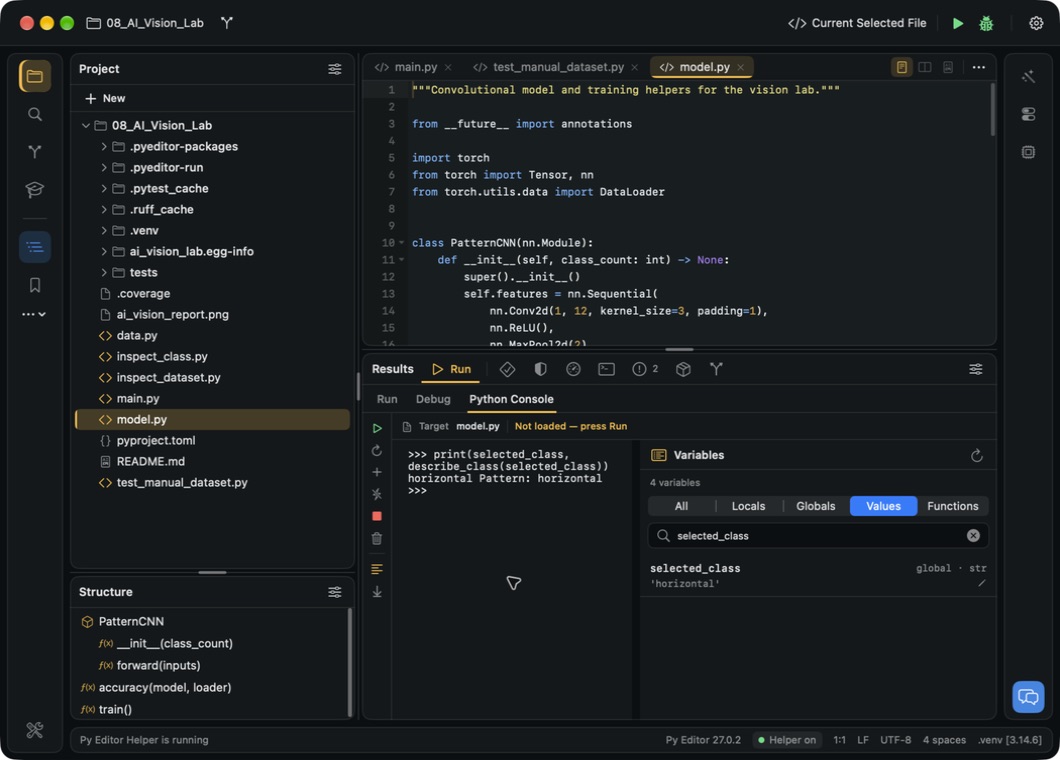 Open the screenshot to view it at full size.
The screenshot comes from the separate four-object filter exercise, with a
single filtered row. If you also created manual_probe in the same session,
your total object count will differ.
Output was cleared before repeating the final expression; the objects remained
available. Not loaded — press Run refers to the selected source file: this
exercise uses the console prompt without executing model.py.
Start over with a new console
New Python Console replaces the current console session; it does not add a second tab that keeps the old session available. Save any output or values you need before using it.
- Finish the current command and wait for
>>>. - Click New Python Console, the plus control in the console toolbar.
- Wait for a fresh
>>>prompt and an empty Variables view. - Enter
manual_probeagain.
After the preceding exercise, the result is NameError: the new interpreter
does not contain the old object. The previous transcript is also cleared. Use
Run File in Python Console again when you want to load a file's objects into
this fresh session.
The console can accept short Python expressions before loading a file. In the reviewed session, Not loaded — press Run referred to the target file, not an inability to type at the available Python prompt.
Interrupt a command or stop the session
Interrupt and Stop Python Console are different controls. Interrupt is intended to interrupt the current command while keeping the interpreter; Stop ends the console session and its in-memory objects.
Observed limitation in this build: Interrupt displayed ^C during a timed
Python wait, but the command still reached its final print statement. Do not use
^C alone as evidence that your code has stopped. Wait for a prompt or a clear
stopped state before assuming that execution has ended.
If you need to end the session, click Stop Python Console. In a separate test, stopping during a timed command immediately showed Python Console stopped, disabled Stop, and did not produce the command's final output. This discards the session; it is not a pause from which execution can resume. It also does not undo files or other changes the program already made.
Finish the session
Click Stop Python Console when you are done. The verified result was Python Console stopped, Not loaded — press Run, and an empty Variables view. Start or load a session again before expecting its objects to be available.
Soft wrap, Scroll to end and Clear console output are separate controls. Long pasted commands displayed duplicated wrapped text at the narrow console width during the test, although their Python results were correct. Short expressions remained readable; do not use the visual echo alone to decide whether a command failed.
Run a shell command in Terminal
Open Terminal from the Results dock.
Wait for the shell prompt.
In the prepared AI Vision Lab project, enter:
.venv/bin/python -c "import torch; print(torch.tensor([1, 2, 3]).sum().item())"Press Return and read the result.
This exact command returned 6, followed by the shell prompt. The shell was
/bin/zsh, opened at the example's project folder. Using .venv/bin/python
explicitly identifies the project interpreter; do not assume a bare python
command means the same one.
The Terminal exposes New session, Interrupt, Soft wrap and Scroll to end. A terminal can execute destructive commands: review commands before running them and never paste credentials into a documentation example.
Read long Terminal output
Use Soft wrap beside the Terminal to change how long output lines are
displayed. With it enabled, the reviewed long line continued onto several screen
lines. With it disabled, the line extended to the right; horizontal scrolling
revealed its final ROW_END marker. The text had not been removed.
For a transcript taller than the panel:
- Scroll upward inside the Terminal to inspect earlier output.
- Scroll downward inside the same area to return to the latest output.
- Check the final message and shell prompt before deciding the command finished.
This was verified with 50 numbered sample-batch lines and a final marker. Manual scrolling reached both the first and last lines. Scroll to end did not move the reviewed Terminal from the top of that completed transcript. Use manual scrolling if the button does not visibly move your view; its presence is not proof you are at the end.
If text stays displaced after changing Soft wrap
After scrolling horizontally to the far right, enabling Soft wrap left the reviewed view displaced and text clipped. Disabling wrapping, scrolling back left and enabling it again did not fully restore the original wrapped layout. This is a display limitation observed in this build, not evidence of lost output.
A fresh Terminal view displayed newly generated output with wrapping correctly again. The review obtained it by switching to Packages and back to Terminal, which replaced the shell and discarded its transcript. Do not use that as a harmless display refresh while a command or important session is active. Finish the work and preserve what you need before creating a new session. This check does not establish the same display behavior in Run or Python Console.
Start a fresh Terminal session
- Finish your current shell command and wait for the prompt.
- Save any output and note the shell setup you need to reproduce.
- Click New session, the plus control beside the terminal.
- Wait for the new prompt in the project folder.
- Re-enter any temporary shell variables or environment setup you need.
This replaces the current shell and clears its displayed transcript; it did not create an additional terminal tab in the reviewed workflow. A temporary shell variable was absent afterward, and the shell process had changed. Do not assume that unsaved session state can be recovered through command history: history restoration has not been verified here.
Minimizing Results or switching to Packages and returning to Terminal also created a fresh shell in the review. These actions therefore require the same care with temporary state as New session.
Check whether Terminal Interrupt actually stopped the command
Click Interrupt to request interruption, then inspect the actual outcome.
In this build, a test using sleep 15 && print WAIT_COMPLETED_SUCCESSFULLY
echoed ^C after Interrupt but still printed the success marker. The wait had
completed successfully; the request did not stop that test command.
Do not treat ^C, a hidden panel or cleared output as proof of cancellation.
Use the program's own documented shutdown procedure for important work and
confirm it has ended. New session was tested on an idle shell. Minimizing Results
also ended a reviewed foreground Python wait, but neither test guarantees that
every child or background process terminates; see
active-command panel behavior.
Which tool should I use?
| Task | Tool |
|---|---|
| Execute the configured program and read its output | Run |
| Execute a file, then ask Python about its objects | Python Console |
| Run shell commands in the project folder | Terminal |
| Pause execution and step through source | Debug; see the verified breakpoint and Step over workflow |
See Project Settings for the interpreter, run configuration and working-directory controls, and AI Vision Lab for the complete training/report tutorial.