Set up Helper, a project environment, packages and services
Give a project its own Python environment, install what it imports, and check the external services it talks to.
Py Editor Helper is a separate signed component that runs as your user. Without it the app still edits and runs dependency-free scripts with its built-in Python. With it you also get project environments, external interpreters, the Terminal, package installation, Git, Docker and the cloud consoles.
Check the Helper connection
- Click the gear in the toolbar to open Application Settings.
- Select Helper.
- Read the connection status and the installed version.
- Click Refresh to check again.
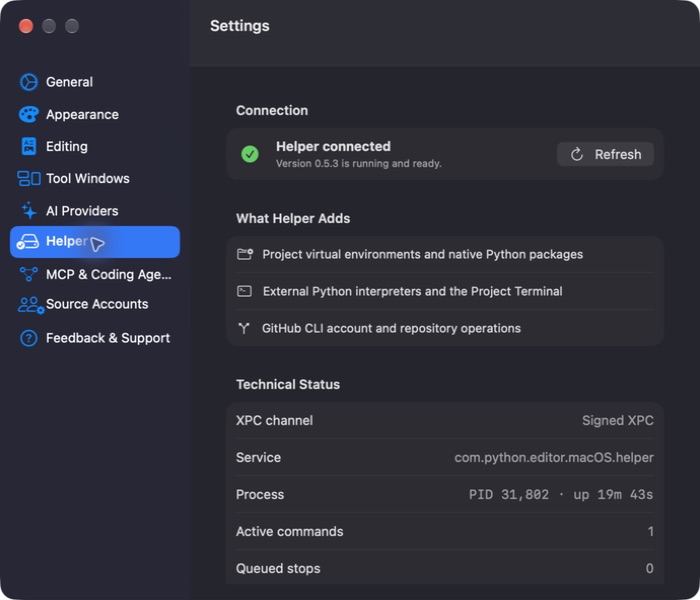 Open the screenshot to view it at full size.
Technical Status lists the channel, process and session counts for the running Helper. A connected Helper does not mean an update check has been made, and it does not mean a project has the packages it needs. The status bar carries the same state: Helper on or Helper off opens the Helper setup sheet from any project window.
Install or update Helper
- Open Application Settings → Helper, or click Helper off in the status bar.
- Click Download Helper, or Download Update when a newer version is offered.
- Choose where to save the installer and click Download. Py Editor checks the signed installer and opens it.
- In Finder, double-click Double-click to Install Py Editor Helper.
- In the installer, choose Install Helper. It installs for your user and asks for no administrator password.
- Return to Py Editor, click Check Again and confirm that Helper is connected.
Do not run a differently named executable from the disk image and do not bypass a signature warning. If a download fails, get a fresh installer from the same screen.
On the same settings page, Restart Helper… stops running Helper commands and Terminal sessions and restarts the service, keeping projects, environments and packages; Uninstall… removes Helper, its MCP executable, its launch agent and its logs, leaving the built-in Python in place.
Prepare a project environment
- Open the project and select its main script.
- If the status bar says Project .venv not created, click that message and wait for the environment to be created.
- Open the Helper setup sheet from the status bar.
- If it lists missing declared packages, choose Install Dependencies.
- Wait for Ready to Run, then choose Done.
- Open Project Settings → Interpreter and confirm that Project .venv is the selected Mode. Select it and click Save if another mode is active.
- Run the script.
Creating the environment and installing packages are separate steps, and both need a network connection. The status bar then shows the environment and its Python version.
You can also prepare or re-read the environment from the menu bar: File →
Prepare Project Environment creates or syncs the .venv, and File → Refresh
Project Environment re-reads Helper, interpreter and package status without
installing anything.
Use a Python installed elsewhere on the Mac
- Open Project Settings → Interpreter.
- Set Mode to Custom.
- Type the interpreter's full path in Custom Path, or click Choose and select it in Choose Python Interpreter.
- Read Status, then click Save.
A Homebrew interpreter has a path such as /opt/homebrew/bin/python3.12; in the file
chooser, press Shift-Command-G to type a folder that Finder keeps hidden. Helper
checks the path, and Status either names what is wrong, as in Path does not
exist. or Path is not a file., or reports the interpreter as ready. The
Python and Executable rows then show the version and the path in use. Custom
mode needs Helper.
Check installed packages
- Open Packages in the Results dock.
- Select Installed.
- Compare each package's name, Installed version and Latest version.
- Click Refresh after installing or removing anything.
The panel's footer names the environment these packages belong to and can include your full project path. A package installed elsewhere on the Mac is not available to this project unless it is in this environment.
Find and install a package
- Enter a name in Search PyPI packages and click Search. The panel switches to PyPI Results.
- Select the exact result you need. Similar names are different packages.
- Check whether it already shows Installed.
- Choose Install in Project from the result's context menu.
- Select Installed and confirm the new package is listed.
Right-click an installed package for Show Package Details, Update to ‹version›, Refresh Packages and Copy Package Name. Installing a package runs third-party code, so install only what your project declares or what you trust.
Install from disk, from Git, or add an index
The "…" menu beside the search field offers:
- From Disk… — choose a package file in the macOS file chooser.
- From Git / VCS… — enter a Repository URL and an optional Revision (branch, tag or commit), then click Install.
- Package Sources… — add an extra index for this project, then click Done.
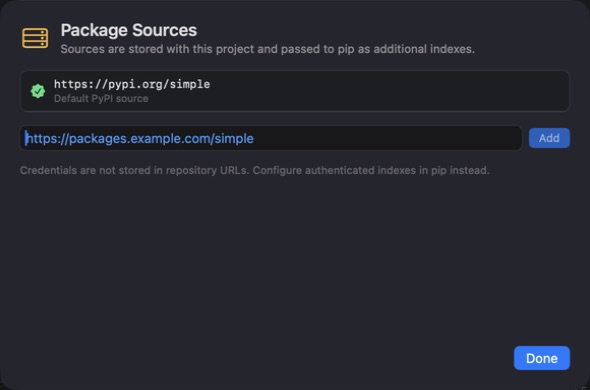 Open the screenshot to view it at full size.
Extra sources are stored with this project and passed to pip.
If an import still fails
Check that the project you opened is the one you meant, and that the interpreter shown in the status bar is the one Packages describes. Read the missing module name in the Run output, install it in this project's environment, then run again.
Check Docker and cloud services
- Click Services on the right rail.
- Select Docker, Google Cloud, Amazon Web Services or Microsoft Azure.
- Read the connection or setup status before acting on a resource.
Docker groups its Containers, Images, Networks and Volumes. Right-click a container for Start Container, Stop Container and Restart Container. When the Docker command line is missing, the pane offers Open Docker Desktop and Check Again.
Each cloud provider needs its own command-line tool installed and signed in. Connected means the account was read, not that every service is enabled. Link to This Project associates a resource with the open project. Sign Out revokes that provider's account on this Mac, not only in this panel.